Even in today's digital world, knowing how to write a check remains an important financial skill. While many payments are made online or through mobile apps, checks are still commonly used for rent, charitable donations, school fees, contractor payments, and other transactions.
If you've never written a check before, you're not alone. As digital payment methods have become more common, many people have had fewer opportunities to learn this basic financial skill. Fortunately, writing a check is simple once you understand the process.
In this guide, we'll explain how to write a check step-by-step, review the different parts of a check, and share tips to help you avoid common mistakes.
Understanding the Parts of a Check
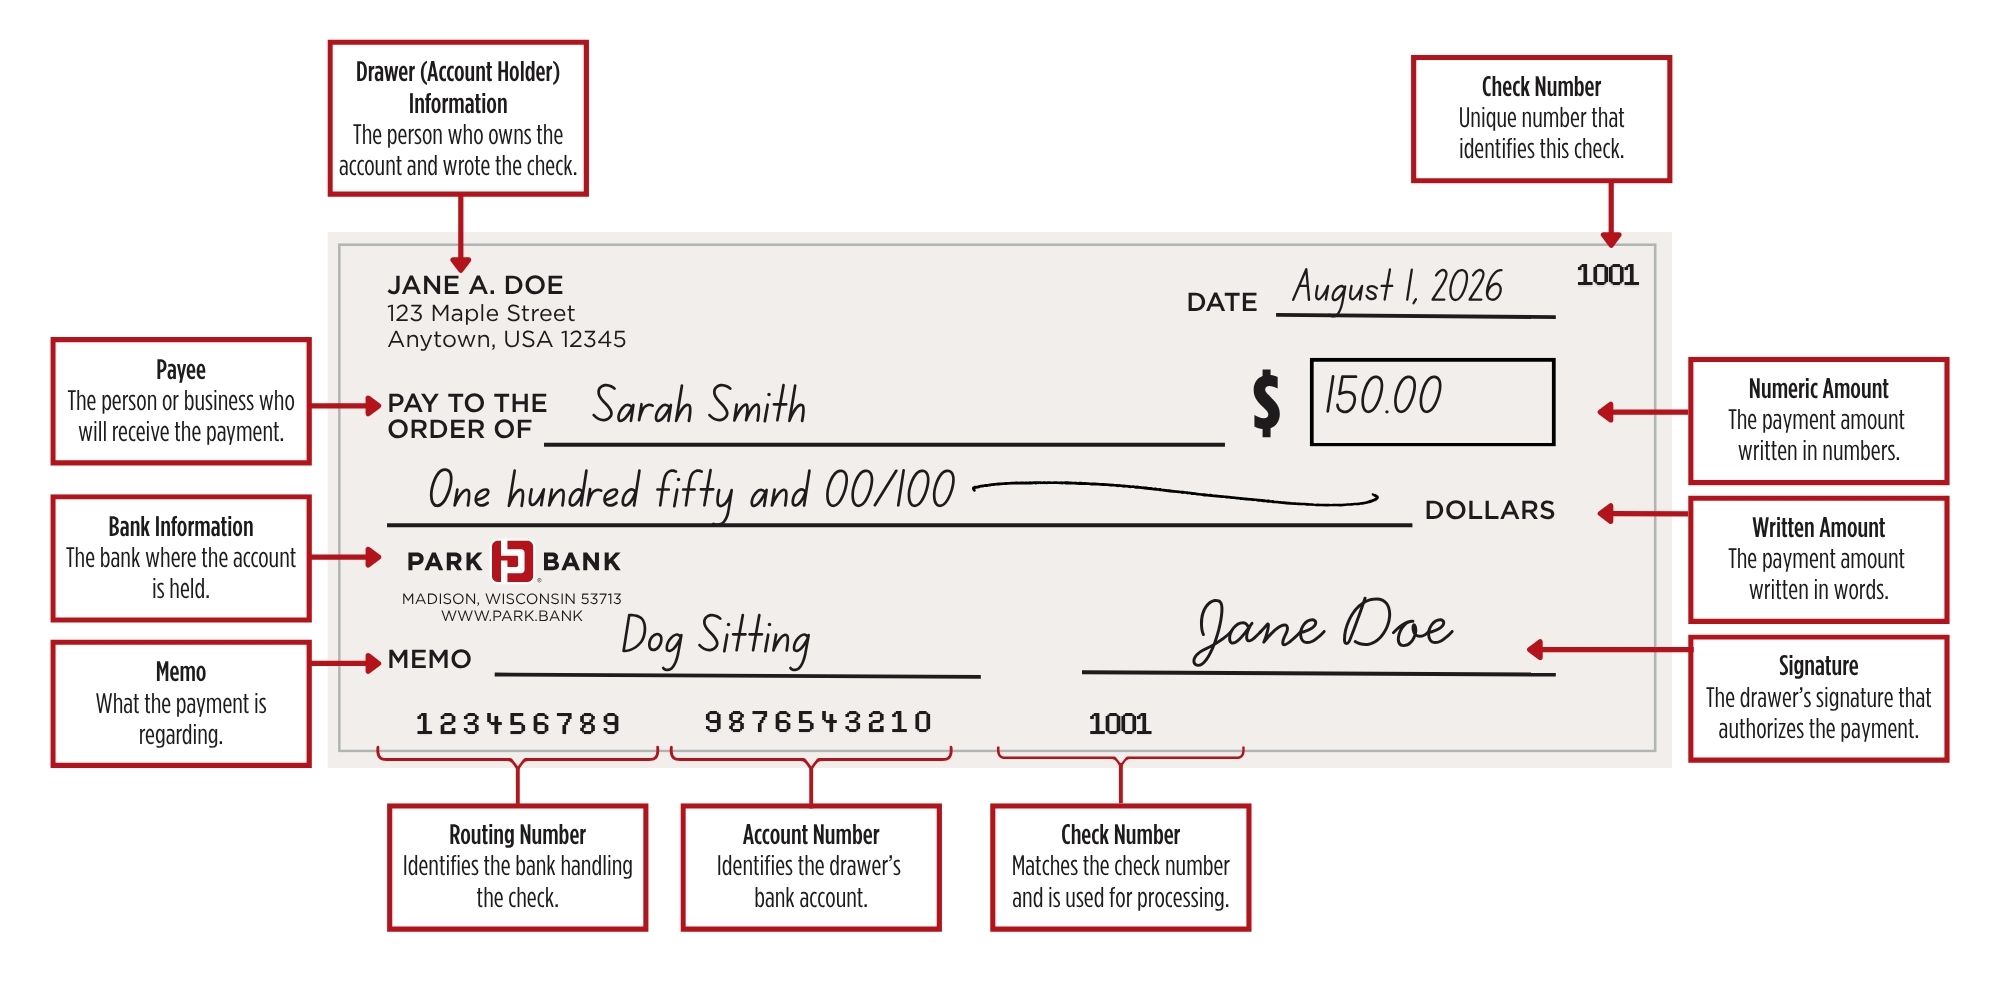
Before learning how to write a check, it's helpful to understand the information included on a standard personal check. Each section serves a purpose and helps ensure your payment is processed correctly.
A check typically includes:
- Date line
- Payee line
- Box for the numerical amount
- Line for the written amount
- Memo line
- Signature line
When each section is completed accurately, your payment can be processed smoothly and securely.
When Might You Need to Write a Check?
While electronic payments are more common today, there are still times when a check is the preferred or required payment method.
You may need to write a check when paying rent, making a donation, hiring a contractor, covering school expenses, mailing a payment, or setting up direct deposit. Understanding how to write a check helps ensure you're prepared whenever these situations arise.
How to Write a Check in 6 Simple Steps
Step 1: Write the Date
Start by writing the current date in the upper-right corner of the check. This tells the recipient and the financial institution when the check was issued.
Use a clear format, such as MM/DD/YYYY, and double-check that the date is accurate before moving on.
Step 2: Add the Payee's Name
On the line that begins with "Pay to the Order of," write the name of the person, business, or organization receiving the payment.
Be sure to spell the name correctly. Errors in the payee's name can delay processing or prevent the check from being deposited.
Step 3: Enter the Amount in Numbers
In the small box on the right side of the check, write the payment amount using numbers.
For example: $125.50
Write the amount as close to the dollar sign as possible to help prevent alterations.
Step 4: Write the Amount in Words
On the line below the payee's name, write the payment amount in words.
For example: One hundred twenty-five and 50/100
After writing the amount, draw a line through any unused space to prevent unauthorized additions.
Step 5: Add a Memo (Optional)
The memo line can be used to describe the purpose of the payment.
Examples include:
- July Rent
- Invoice #1234
- Birthday Gift
- School Fundraiser
While not required, a memo can be useful for record-keeping and future reference.
Step 6: Sign the Check
The final step is signing your name on the signature line in the bottom-right corner.
Without a signature, a check is not valid. Make sure your signature matches the one associated with your account whenever possible.
Review Your Check Before You Hand It Over
Before delivering or mailing your check, take a moment to review your information.
Confirm that:
- The date is correct
- The payee's name is accurate
- The numerical and written amounts match
- The check is signed
- Any memo information is correct
A quick review can help prevent delays, errors, and the need to rewrite the check.
Example of a Properly Filled Out Check
When completed correctly, a check should include:
- Current date
- Recipient's name
- Matching numerical and written amounts
- Optional memo
- Signature
Having a sample check available as a reference can be helpful, especially if you're writing a check for the first time.


 Eglantina Anderson, Assistant Vice President Branch Operations